Unit 2 1.6 Erect a temporary shelter, using tarpaulin and ropes.
Shelter Building
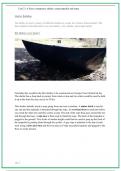
The ability to erect a variety of different shelters is a must for a Forest School leader! The
three shelters I describe below are a kit shelter, a low shelter, and a high shelter.
Kit Shelter (very basic!)
Normally this would be the first shelter to be constructed as it keeps Forest School kit dry.
The shelter has a drop back to protect from wind or rain and two sticks could be used to hold
it up at the front for easy access to FS kit.
This shelter initially needs a rope going from one tree to another. A timber hitch is used at
one end and the tarpaulin is threaded through the rope. An overhand knot is used just before
you reach the other tree and this creates a loop. The end of the rope then goes around the tree
and through the loop. A slip knot is then used to finish the rope. The back of the tarpaulin is
pegged to the ground. Two sticks of similar height could then be used to prop up the front of
the tarpaulin by putting them through the eyelets. A guy rope is attached to the top of each
stick using a larks foot knot and the two pieces of rope are pulled separate and pegged to the
floor to create tension.
pg. 1
Shelter Building
The ability to erect a variety of different shelters is a must for a Forest School leader! The
three shelters I describe below are a kit shelter, a low shelter, and a high shelter.
Kit Shelter (very basic!)
Normally this would be the first shelter to be constructed as it keeps Forest School kit dry.
The shelter has a drop back to protect from wind or rain and two sticks could be used to hold
it up at the front for easy access to FS kit.
This shelter initially needs a rope going from one tree to another. A timber hitch is used at
one end and the tarpaulin is threaded through the rope. An overhand knot is used just before
you reach the other tree and this creates a loop. The end of the rope then goes around the tree
and through the loop. A slip knot is then used to finish the rope. The back of the tarpaulin is
pegged to the ground. Two sticks of similar height could then be used to prop up the front of
the tarpaulin by putting them through the eyelets. A guy rope is attached to the top of each
stick using a larks foot knot and the two pieces of rope are pulled separate and pegged to the
floor to create tension.
pg. 1