Tissue Plans
Introduction
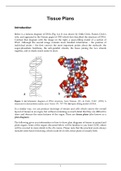
Below is a famous diagram of DNA (Fig. 1a). It was drawn by Odile Crick, Francis Crick’s
wife, and appeared in the Nature paper of 1953 which first described the structure of DNA.
Contrast that diagram with the image on the right, a space-filling model of a section of
DNA. Although the second image contains more detailed information – the position of
individual atoms – the first conveys the most important points about the molecule: the
sugar-phosphate backbone, the anti-parallel strands, the bases joining the two strands
together, and is clearly much easier to draw.
a b
Figure 1. (a) Schematic diagram of DNA structure, from Watson, J.D., & Crick, F.H.C. (1953) A
structure for deoxyribose nucleic acid. Nature 171: 737–738. (b) Space-filling model of DNA.
In a similar way, we can produce drawings of tissues and cells which convey the overall
layout of tissues in an organ, but without containing so much detail that they are difficult to
draw and obscure the main features of the organ. These are tissue plans (also known as a
plan diagram).
The following gives you information on how to draw plan diagrams of tissues in animal and
plant organs. Some of the organs discussed below will be familiar to you from GCSE, others
will be covered in more detail in the AS course. Please note that the practical exam always
includes some kind of drawing, which could be of cells, tissue plans or usually both.
1
, Definitions:
Tissue: A group of similar cells that perform a particular function.
Organ: A collection of tissues that work together to perform a specific function or functions.
Drawing Tissue Plans and Cells in Biology
Tissue Plans
A tissue plan consists of a broad outline of the structure, with the regions occupied by
particular tissue types drawn around and labelled. Note that individual cells are not drawn.
The drawing should always be drawn in pencil, with clear, continuous lines. Although
somewhat schematic, the relative size and shapes of the different tissues should relate to the
actual slide you are drawing.
A good example of a root tissue plan is shown in Figure 2.
Figure 2. A tissue plan of a cross section of a root. Note the clear, continuous lines and labels. No cells
are shown in tissue plans.
When you draw a tissue plan, follow these guidelines:
• Make the drawing fill the space provided, but leave enough space around the
drawing itself for labels and annotations. You will be penalised for drawings that are
too small.
• Use a sharp HB pencil (do not draw in pen). A 0.5 mm mechanical pencil is strongly
recommended. Lines should be <1 mm wide.
• Use a single, unbroken line (often referred to in mark schemes as ‘clear and
continuous lines’).
• Show the outline of the tissues, with your lines fully enclosing the areas.
• Make the proportions of tissues in the diagram the same as in the section.
• Do not include drawings of any cells.
• Do not use any shading or colouring.
2
Introduction
Below is a famous diagram of DNA (Fig. 1a). It was drawn by Odile Crick, Francis Crick’s
wife, and appeared in the Nature paper of 1953 which first described the structure of DNA.
Contrast that diagram with the image on the right, a space-filling model of a section of
DNA. Although the second image contains more detailed information – the position of
individual atoms – the first conveys the most important points about the molecule: the
sugar-phosphate backbone, the anti-parallel strands, the bases joining the two strands
together, and is clearly much easier to draw.
a b
Figure 1. (a) Schematic diagram of DNA structure, from Watson, J.D., & Crick, F.H.C. (1953) A
structure for deoxyribose nucleic acid. Nature 171: 737–738. (b) Space-filling model of DNA.
In a similar way, we can produce drawings of tissues and cells which convey the overall
layout of tissues in an organ, but without containing so much detail that they are difficult to
draw and obscure the main features of the organ. These are tissue plans (also known as a
plan diagram).
The following gives you information on how to draw plan diagrams of tissues in animal and
plant organs. Some of the organs discussed below will be familiar to you from GCSE, others
will be covered in more detail in the AS course. Please note that the practical exam always
includes some kind of drawing, which could be of cells, tissue plans or usually both.
1
, Definitions:
Tissue: A group of similar cells that perform a particular function.
Organ: A collection of tissues that work together to perform a specific function or functions.
Drawing Tissue Plans and Cells in Biology
Tissue Plans
A tissue plan consists of a broad outline of the structure, with the regions occupied by
particular tissue types drawn around and labelled. Note that individual cells are not drawn.
The drawing should always be drawn in pencil, with clear, continuous lines. Although
somewhat schematic, the relative size and shapes of the different tissues should relate to the
actual slide you are drawing.
A good example of a root tissue plan is shown in Figure 2.
Figure 2. A tissue plan of a cross section of a root. Note the clear, continuous lines and labels. No cells
are shown in tissue plans.
When you draw a tissue plan, follow these guidelines:
• Make the drawing fill the space provided, but leave enough space around the
drawing itself for labels and annotations. You will be penalised for drawings that are
too small.
• Use a sharp HB pencil (do not draw in pen). A 0.5 mm mechanical pencil is strongly
recommended. Lines should be <1 mm wide.
• Use a single, unbroken line (often referred to in mark schemes as ‘clear and
continuous lines’).
• Show the outline of the tissues, with your lines fully enclosing the areas.
• Make the proportions of tissues in the diagram the same as in the section.
• Do not include drawings of any cells.
• Do not use any shading or colouring.
2