Unit 2 – Creating Systems to Manage Information
Evidence Needed
Activity 1
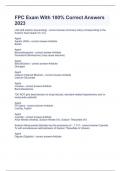
There is no template for this evidence, simply copy and paste a screenshot of your database
relationships from Access into a Word document and save as a pdf.
TIP: Make sure that ALL the fields in ALL the tables are clearly visible. Any cropped field names or
tables with scroll bars will mean losing marks
Activity 2
Table Structures
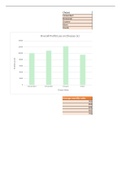
Add screenprints of each of your tables in design view showing the table names, field names and
data types ONLY
You will need screenshots of ALL your tables here
1. Do not crop the table name tab
2. Do not crop the primary key
3. Make sure you are using consistent names for ALL your fields in ALL your tables e.g.
CamelCase or spaces
4. Make sure you use the correct naming convention for your tables i.e. tbl
5. Make sure you have used the correct data types for all your fields e.g. data/time, currency,
short text, number, yes/no
6. Make sure the screenshot is large enough for the examiner to see
Example
, Unit 2 – Creating Systems to Manage Information
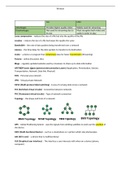
Table Validation
Ensure the validation and the field it is applied to can be seen clearly in your screenshots.
Presence Check
Add a screenprint of ONE presence check
1. Check the Activity 2 requirements to find out what fields need to be completed e.g. a
record will not save without the surname and telephone number of the volunteer
information being present
2. Use one of these as your evidence
3. Validation rule should be Is Not Null
4. Validation text must have a user friendly message
5. Make sure that the table name and the field the validation relates to is shown in the
screenshot
Example
Evidence Needed
Activity 1
There is no template for this evidence, simply copy and paste a screenshot of your database
relationships from Access into a Word document and save as a pdf.
TIP: Make sure that ALL the fields in ALL the tables are clearly visible. Any cropped field names or
tables with scroll bars will mean losing marks
Activity 2
Table Structures
Add screenprints of each of your tables in design view showing the table names, field names and
data types ONLY
You will need screenshots of ALL your tables here
1. Do not crop the table name tab
2. Do not crop the primary key
3. Make sure you are using consistent names for ALL your fields in ALL your tables e.g.
CamelCase or spaces
4. Make sure you use the correct naming convention for your tables i.e. tbl
5. Make sure you have used the correct data types for all your fields e.g. data/time, currency,
short text, number, yes/no
6. Make sure the screenshot is large enough for the examiner to see
Example
, Unit 2 – Creating Systems to Manage Information
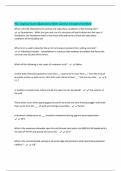
Table Validation
Ensure the validation and the field it is applied to can be seen clearly in your screenshots.
Presence Check
Add a screenprint of ONE presence check
1. Check the Activity 2 requirements to find out what fields need to be completed e.g. a
record will not save without the surname and telephone number of the volunteer
information being present
2. Use one of these as your evidence
3. Validation rule should be Is Not Null
4. Validation text must have a user friendly message
5. Make sure that the table name and the field the validation relates to is shown in the
screenshot
Example