Photography Page 1 of 1
An introduction to using SilverFast SE version 6.5.5r2
and the Plustek Optic Film 7300 film scanner
For a quick scan
Place the negatives into the negatives holder and slide it into the film scanner.
Press the QuickScan button on the film scanner.
Presto Page Manager will appear showing where the image is saved (usually
in the QuickScan folder).
For a scan that gives you control over the settings
Place the negatives into the negatives holder and slide it into the film scanner.
Press the IntelliScan button on the film scanner.
Click on the Continue to SilverFast button.
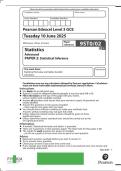
In the SilverFast-SE v6.5.5r2 dialogue box, click on the general tab and select
the negative mode.
In the Negative dialogue box leave the Auto and CCR ticked.
Select the film manufacturer and type of film and film speed if you know
them.
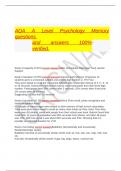
In the ScanPilot dialogue click once on the play button.
Adjust the red frame to select the part of the picture to scan.
After reading the Note click OK to close the dialogue box.
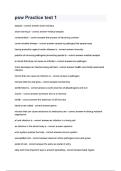
In the SilverFast-SE v6.5.5r2 dialogue box, click on the frame tab and select
the options you want.
Press return.
In the Graduation Curves dialogue box, alter the graduation curves if
necessary.
Press return.
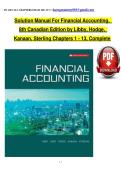
In the Output Size dialogue box select the output size and resolution.
Press return.
In the Save As dialogue box choose where to save the image using the Save in
box, the image type in the Save as type box and file name in the File name
box.
© Mr Timothy John Tyne
An introduction to using SilverFast SE version 6.5.5r2
and the Plustek Optic Film 7300 film scanner
For a quick scan
Place the negatives into the negatives holder and slide it into the film scanner.
Press the QuickScan button on the film scanner.
Presto Page Manager will appear showing where the image is saved (usually
in the QuickScan folder).
For a scan that gives you control over the settings
Place the negatives into the negatives holder and slide it into the film scanner.
Press the IntelliScan button on the film scanner.
Click on the Continue to SilverFast button.
In the SilverFast-SE v6.5.5r2 dialogue box, click on the general tab and select
the negative mode.
In the Negative dialogue box leave the Auto and CCR ticked.
Select the film manufacturer and type of film and film speed if you know
them.
In the ScanPilot dialogue click once on the play button.
Adjust the red frame to select the part of the picture to scan.
After reading the Note click OK to close the dialogue box.
In the SilverFast-SE v6.5.5r2 dialogue box, click on the frame tab and select
the options you want.
Press return.
In the Graduation Curves dialogue box, alter the graduation curves if
necessary.
Press return.
In the Output Size dialogue box select the output size and resolution.
Press return.
In the Save As dialogue box choose where to save the image using the Save in
box, the image type in the Save as type box and file name in the File name
box.
© Mr Timothy John Tyne