Assignment 3 – Manufacturing and Repairing FRP composite Components
For our FRP composite we used Carbon Fibre which was already
impregnated:
• Before we even began the manufacturing or the preparing
process, we had to take out the Carbon Fibre sheets out of the
Chest freezer (the carbon fibre is kept between -10 to -15
Celsius). This is due to the fact that if we store the impregnated Carbon fibre
in room temperature it will start curing by its own, by keeping it in the
freezer we can prevent this. By taking it out of the freezer 24 hours before
our practical we make sure the impregnated carbon fibre is at a temperature
where it does not crack, and it can easily be cut into the shapes and sizes
desired.
The process:
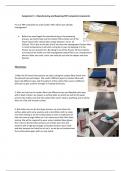
1.After the 24 hours have passed, we start cutting the carbon fibre sheets into
the desired size and shapes. We used 5 different layers of carbon fibre each
layer had different sizes and the pattern of the carbon fibre were in different
direction to give uniform strength in multiple directions.
2. After we had cut the carbon fibre into different sizes and labelled each layer
with a black marker, we require a surface plate on which we will do the layup
process this makes sure that the carbon fibre won’t stick to anything, and it will be
done on a flat and smooth surface.
3. But before we can do the layup process, we must clean the
surface plate with some acetone and a microfibre cloth to make
sure that nothing is on the surface plate as even a small piece of
hair can cause a huge failure as it can come up on the Ultra Sonic
testing. We will be required to wear some standard latex gloves
this is due to the fact that acetone can irritate your skin and
acetone with a high percentage of alcohol and burn your hand
and also because our hand has oil on it, so we do not contaminate
the surface plate again with our oily hands.
, 4.Then using some tissues we must
wipe of the excess of solution that is
present on the surface plate this is to
speed up the process as we cannot
wait until the solution is fully
evaporated.
5. After that we are required to place a strip of vacuum
bagging tape into each side and corner of the place, and we must make sure there are no gaps left
between them. After we have placed the vacuum bagging tape, we must
make sure not to take of the brown paper form the top as we will do this in a
later stage.
6. We must take of our latex gloves and put on the special gloves which is
used to prevent the matrix in the carbon fibre from irritating our hands (the
gloves can last 8 hours before it starts to break down due to the chemicals in
the matrix)
7. We must cut the release film into size smaller; it must be
smaller as must not reach the vacuum bagging tape. We will use an
electric scissor to cut the release film and using 4 bits of tape we
will secure it to the metal plate. We use the release film to prevent
the carbon fibre from sticking to the metal plate and by using the
release film it makes it easier to remove the final component.
8.Then we must take ply 1 which has its fibres at 0 degrees, and
we must carefully peel off the yellow backing sheet then we must
carefully place it in the centre of the release film, and we must make
sure that its evened out properly and that there no air bubbles
present under the carbon fibre. Then we can remove the blue sheet
on top too, but we must make sure not to damage the fibres while
we are trying to peel the blue layer off.
9.After we have taken off the blue layer from ply 1, we must get ply
two and repeat the process which is removing the yellow backing
sheet and applying it on top of ply 1 we must make sure it is applied
on it straight how its oriented on the blue sheet. Ply 2 fibres are
directional at 45 degrees, after we applied the 2nd ply, we must make sure its stuck properly
and that there are no air bubbles are present and then we can remove the blue sheet from
ply 2
For our FRP composite we used Carbon Fibre which was already
impregnated:
• Before we even began the manufacturing or the preparing
process, we had to take out the Carbon Fibre sheets out of the
Chest freezer (the carbon fibre is kept between -10 to -15
Celsius). This is due to the fact that if we store the impregnated Carbon fibre
in room temperature it will start curing by its own, by keeping it in the
freezer we can prevent this. By taking it out of the freezer 24 hours before
our practical we make sure the impregnated carbon fibre is at a temperature
where it does not crack, and it can easily be cut into the shapes and sizes
desired.
The process:
1.After the 24 hours have passed, we start cutting the carbon fibre sheets into
the desired size and shapes. We used 5 different layers of carbon fibre each
layer had different sizes and the pattern of the carbon fibre were in different
direction to give uniform strength in multiple directions.
2. After we had cut the carbon fibre into different sizes and labelled each layer
with a black marker, we require a surface plate on which we will do the layup
process this makes sure that the carbon fibre won’t stick to anything, and it will be
done on a flat and smooth surface.
3. But before we can do the layup process, we must clean the
surface plate with some acetone and a microfibre cloth to make
sure that nothing is on the surface plate as even a small piece of
hair can cause a huge failure as it can come up on the Ultra Sonic
testing. We will be required to wear some standard latex gloves
this is due to the fact that acetone can irritate your skin and
acetone with a high percentage of alcohol and burn your hand
and also because our hand has oil on it, so we do not contaminate
the surface plate again with our oily hands.
, 4.Then using some tissues we must
wipe of the excess of solution that is
present on the surface plate this is to
speed up the process as we cannot
wait until the solution is fully
evaporated.
5. After that we are required to place a strip of vacuum
bagging tape into each side and corner of the place, and we must make sure there are no gaps left
between them. After we have placed the vacuum bagging tape, we must
make sure not to take of the brown paper form the top as we will do this in a
later stage.
6. We must take of our latex gloves and put on the special gloves which is
used to prevent the matrix in the carbon fibre from irritating our hands (the
gloves can last 8 hours before it starts to break down due to the chemicals in
the matrix)
7. We must cut the release film into size smaller; it must be
smaller as must not reach the vacuum bagging tape. We will use an
electric scissor to cut the release film and using 4 bits of tape we
will secure it to the metal plate. We use the release film to prevent
the carbon fibre from sticking to the metal plate and by using the
release film it makes it easier to remove the final component.
8.Then we must take ply 1 which has its fibres at 0 degrees, and
we must carefully peel off the yellow backing sheet then we must
carefully place it in the centre of the release film, and we must make
sure that its evened out properly and that there no air bubbles
present under the carbon fibre. Then we can remove the blue sheet
on top too, but we must make sure not to damage the fibres while
we are trying to peel the blue layer off.
9.After we have taken off the blue layer from ply 1, we must get ply
two and repeat the process which is removing the yellow backing
sheet and applying it on top of ply 1 we must make sure it is applied
on it straight how its oriented on the blue sheet. Ply 2 fibres are
directional at 45 degrees, after we applied the 2nd ply, we must make sure its stuck properly
and that there are no air bubbles are present and then we can remove the blue sheet from
ply 2