Photography Page 1 of 18
Using GNU Image Manipulation Program (GIMP) 3.0.4 - An introduction
Opening the application and files
Opening GIMP
• Click on the Start button then select All > and click on Gimp 3.0.4
Opening a picture file
• Click on File on the menu bar then select and click on Open… Ctrl + O. Use
the Open screen to select the file you want to open by clicking to open the
folders it is in (on the left hand side) and then scroll to find the file. Once
found double click on the picture file to open it.
Digital editing workflow
Digital editing workflow is digital editing of a photograph to improve it. The order of
the steps is important since alterations made by one step should not be undone or
changed by a later step. Moving from general global alterations to more selective
specific changes is best.
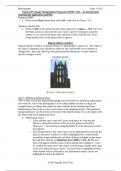
Unedited picture
STAGE 1: CREATING A COPY
Step1 - Making a duplicate layer.
This is done so that the original photograph can be returned to should the adjustments
not work out. Also if the photograph is to be edited further to form a collage for
example there are things that cannot be done with the locked background layer.
Duplicating it frees it up so more can be done to the duplicated layer. The unaltered
background layer can be deleted at the end of the digital editing if you are happy with
the final result in the duplicated layer.
• Duplicating a layer
o If not already open, open the Layers workspace by selecting the
Windows drop down menu on the menu bar going to Dockable
Dialogues > and clicking on Layers Ctrl + L in the drop down menu
that appears.
o The background (or any other) layer can be duplicated by selecting the
layer in the layers window (it will be highlighted by a white border
around the image thumbnail) and then clicking on Layer on the menu
bar and then clicking on Duplicate layer Shift + Ctrl + D The new
layer will appear with the name of the original layer ending in “ copy”
To change the name move the cursor over the name, double click, type
in the new name then press Enter. Any layer that is highlighted with a
white border will be affected by any adjustments made. Layers not
highlighted will not be affected.
© Mr Timothy John Tyne
, Photography Page 2 of 18
• Add a transparent background to a layer
When erasing part of an image layer in GIMP the erased part reveals a plain
background colour unlike photoshop where the erased part becomes
transparent revealing the layer below. To make a layer behave like photoshop
with a transparent background follow the steps below
o Add a new (transparent) layer to the layer stack by selecting the Layer
drop down menu on the menu bar and then clicking on New Layer…
Shift + Ctrl + N.
Ensure Transparency is selected in the Fill with: drop down menu
and click OK.
o In the Layers column on the right hold the Shift key, click on the new
layer and drag the new layer so it is immediately below the layer you
want to add a transparent background to.
o Select ONLY the layer you want to add the transparent background to
(so it has a white border, making sure no other layers are selected).
o Ensure only the selected layer and new transparent layer are marked as
visible (making sure no other layers are visible) by checking the eyes
appear on the left of the thumbnail in the layer column.
o Select the Layer drop down menu on the menu bar and click on Merge
Down (or right click and select Merge Down).
Note If this layer is now duplicated it too will have a transparent background
when part of it is erased.
• Turn off the visibility and deselect the background layer
o The Background layer will now be below the new duplicated layer. It
is best to click on the eye if it is still visible in a box on the left of the
Background layer so it disappears. This turns off the visibility of the
background layer so it does not appear during editing.
o It is also best to deselect it. If a white frame appears around the
background layer click on it so it no longer appears. This deselects the
image and prevents it being altered during editing.
© Mr Timothy John Tyne
Using GNU Image Manipulation Program (GIMP) 3.0.4 - An introduction
Opening the application and files
Opening GIMP
• Click on the Start button then select All > and click on Gimp 3.0.4
Opening a picture file
• Click on File on the menu bar then select and click on Open… Ctrl + O. Use
the Open screen to select the file you want to open by clicking to open the
folders it is in (on the left hand side) and then scroll to find the file. Once
found double click on the picture file to open it.
Digital editing workflow
Digital editing workflow is digital editing of a photograph to improve it. The order of
the steps is important since alterations made by one step should not be undone or
changed by a later step. Moving from general global alterations to more selective
specific changes is best.
Unedited picture
STAGE 1: CREATING A COPY
Step1 - Making a duplicate layer.
This is done so that the original photograph can be returned to should the adjustments
not work out. Also if the photograph is to be edited further to form a collage for
example there are things that cannot be done with the locked background layer.
Duplicating it frees it up so more can be done to the duplicated layer. The unaltered
background layer can be deleted at the end of the digital editing if you are happy with
the final result in the duplicated layer.
• Duplicating a layer
o If not already open, open the Layers workspace by selecting the
Windows drop down menu on the menu bar going to Dockable
Dialogues > and clicking on Layers Ctrl + L in the drop down menu
that appears.
o The background (or any other) layer can be duplicated by selecting the
layer in the layers window (it will be highlighted by a white border
around the image thumbnail) and then clicking on Layer on the menu
bar and then clicking on Duplicate layer Shift + Ctrl + D The new
layer will appear with the name of the original layer ending in “ copy”
To change the name move the cursor over the name, double click, type
in the new name then press Enter. Any layer that is highlighted with a
white border will be affected by any adjustments made. Layers not
highlighted will not be affected.
© Mr Timothy John Tyne
, Photography Page 2 of 18
• Add a transparent background to a layer
When erasing part of an image layer in GIMP the erased part reveals a plain
background colour unlike photoshop where the erased part becomes
transparent revealing the layer below. To make a layer behave like photoshop
with a transparent background follow the steps below
o Add a new (transparent) layer to the layer stack by selecting the Layer
drop down menu on the menu bar and then clicking on New Layer…
Shift + Ctrl + N.
Ensure Transparency is selected in the Fill with: drop down menu
and click OK.
o In the Layers column on the right hold the Shift key, click on the new
layer and drag the new layer so it is immediately below the layer you
want to add a transparent background to.
o Select ONLY the layer you want to add the transparent background to
(so it has a white border, making sure no other layers are selected).
o Ensure only the selected layer and new transparent layer are marked as
visible (making sure no other layers are visible) by checking the eyes
appear on the left of the thumbnail in the layer column.
o Select the Layer drop down menu on the menu bar and click on Merge
Down (or right click and select Merge Down).
Note If this layer is now duplicated it too will have a transparent background
when part of it is erased.
• Turn off the visibility and deselect the background layer
o The Background layer will now be below the new duplicated layer. It
is best to click on the eye if it is still visible in a box on the left of the
Background layer so it disappears. This turns off the visibility of the
background layer so it does not appear during editing.
o It is also best to deselect it. If a white frame appears around the
background layer click on it so it no longer appears. This deselects the
image and prevents it being altered during editing.
© Mr Timothy John Tyne