Lab 7: Convex and Concave Lenses Virtual Lab
Name:
The objective of the lab is to learn the properties of image formed by convex and concave lenses.
Online Lenses Experiment Setup Instructions.
1. Go to the following website: https://ophysics.com/l12.html
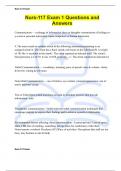
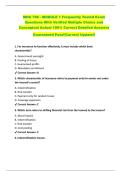
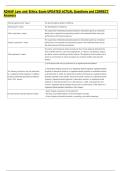
2. Figure 1 shows an example of what you should see on your screen.
Figure 1: Initial Configuration after opening the Concave and Convex Lenses Simulator
3. Click on the top of the Object arrow.
• Move the tip of the "Object" arrow Up or Down to adjust the object height,h0.
• Move the tip of the "Object" arrow Left or Right to adjust the object distance, do.
• Move the point named Focus’ to change the focal length
• Move the point named Focus’ to the right side of the lens to change to a concave lens.
1
, Part I: Ray Tracing for Lenses
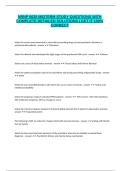
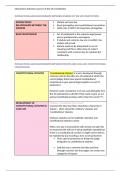
1. Is the diagram above a Concave (Diverging) or a Convex (Converging)
Lens? It’s a convex (converging) lens.
2. Based on the location of the object, is the Image Type: Real or
Virtual? The image type is real.
3. Is the Image Orientation: Upright or
Inverted? The image is inverted.
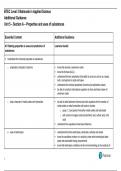
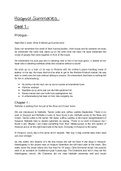
4. Is the diagram above a Concave (Diverging) or a Convex (Converging)
Lens? It is concave (diverging).
5. Based on the location of the object, is the Image Type: Real or
Virtual? It is virtual.
6. Is the Image Orientation: Upright or
Inverted? It is upright.
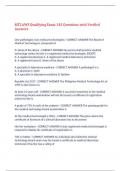
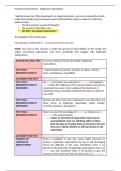
7. Is the diagram above a Concave (Diverging) or a Convex (Converging)
Lens? It is convex (converging).
8. Based on the location of the object, is the Image Type: Real or
Virtual? It is virtual.
9. Is the Image Orientation: Upright or
Inverted? It is upright.
2
Name:
The objective of the lab is to learn the properties of image formed by convex and concave lenses.
Online Lenses Experiment Setup Instructions.
1. Go to the following website: https://ophysics.com/l12.html
2. Figure 1 shows an example of what you should see on your screen.
Figure 1: Initial Configuration after opening the Concave and Convex Lenses Simulator
3. Click on the top of the Object arrow.
• Move the tip of the "Object" arrow Up or Down to adjust the object height,h0.
• Move the tip of the "Object" arrow Left or Right to adjust the object distance, do.
• Move the point named Focus’ to change the focal length
• Move the point named Focus’ to the right side of the lens to change to a concave lens.
1
, Part I: Ray Tracing for Lenses
1. Is the diagram above a Concave (Diverging) or a Convex (Converging)
Lens? It’s a convex (converging) lens.
2. Based on the location of the object, is the Image Type: Real or
Virtual? The image type is real.
3. Is the Image Orientation: Upright or
Inverted? The image is inverted.
4. Is the diagram above a Concave (Diverging) or a Convex (Converging)
Lens? It is concave (diverging).
5. Based on the location of the object, is the Image Type: Real or
Virtual? It is virtual.
6. Is the Image Orientation: Upright or
Inverted? It is upright.
7. Is the diagram above a Concave (Diverging) or a Convex (Converging)
Lens? It is convex (converging).
8. Based on the location of the object, is the Image Type: Real or
Virtual? It is virtual.
9. Is the Image Orientation: Upright or
Inverted? It is upright.
2