Skills for Biologists: Data Science
Introduction to R- Studio / Posit Cloud
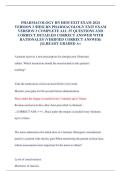
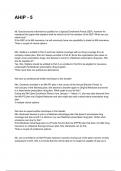
When you first go onto the website, have created an account, and logged in. You will see an
option to start a new project – do this and select “new R project”. It will open a page like this:
In the top right-hand corner, there is a setting logo– you’ll need to select this, go to the
‘Resources’ option and lower the RAM and the CPU both to 0.5 (the lowest it will possibly
go), then click apply changes.
Next, you’re going to want to name your project something recognisable and relevant to the
data you will be inputting in. You can do this either in the same settings you were just in, or
by simply clicking where it will say ‘Untitled Project’ in the top left corner.
You’re now ready to open a new R script – this sounds confusing as that’s what you may
think you have just done – however, this will open a new ‘window’ on your screen where
you’ll be inputting your code and where you’ll be saving your work. To do this, you will need
to go to ‘file’, ‘new file’, and then new R script. Alternatively, you can simple to
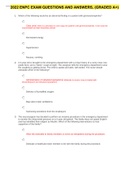
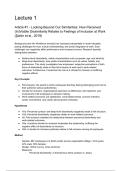
“Ctrl+Alt+Shift+N” and this will open up one for you. You should now have four windows
open on your screen, I’ve labelled these 1-4 for easier following.
, Panel 1 is where you will input all of your code, this will make finding mistakes A LOT easier
to find as well as ensuring that your work stays neat and presentable.
Panel 2 is where the code output will show. You will also notice that any errors will flag up in
red in this area along with telling you what line the error is in.
Panel 3 is where all of your data, graphs, etc will stay. This can be emptied but you have to
ensure that you re-run any installed packages (explained later) if and when you do empty
this.
Panel 4 has multiple tabs above it. You’re only really interested in 3 at this moment in time,
these are files, plots, and help.
Your next step in setting up your page for your data is focused in your panel 4. It will already
be on the files tab, you will need to stay on this tab, and create 3 new folders, named
‘scripts’, ‘figures’, and ‘data’. It is important to note that R is very case sensitive, so it is
recommended that all of your work is written in only lower case.
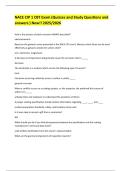
Your data should be given to you in the form of an excel spreadsheet, open this up in excel
and make sure you save it to your computer under a sensible name (remember R doesn’t
like spaces, so use underscores (_) in place of spaces) and as a .csv file. To do this, go to
save as, go to the drop-down menu underneath where you renamed your file, and select the
option that says ‘CSV UTF-8 (Comma delimited) (*.csv)’.
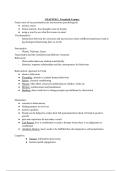
To upload this data onto your R project, go to your files tab in panel 4, click on your ‘data’
folder, and you want to select the tab that says ‘upload’, this should be the 3rd tab in this
folder. You then need to select ‘choose file’ and then find and upload the .csv file you just
saved. Then click okay. We’ll come back to this in a second.
Introduction to R- Studio / Posit Cloud
When you first go onto the website, have created an account, and logged in. You will see an
option to start a new project – do this and select “new R project”. It will open a page like this:
In the top right-hand corner, there is a setting logo– you’ll need to select this, go to the
‘Resources’ option and lower the RAM and the CPU both to 0.5 (the lowest it will possibly
go), then click apply changes.
Next, you’re going to want to name your project something recognisable and relevant to the
data you will be inputting in. You can do this either in the same settings you were just in, or
by simply clicking where it will say ‘Untitled Project’ in the top left corner.
You’re now ready to open a new R script – this sounds confusing as that’s what you may
think you have just done – however, this will open a new ‘window’ on your screen where
you’ll be inputting your code and where you’ll be saving your work. To do this, you will need
to go to ‘file’, ‘new file’, and then new R script. Alternatively, you can simple to
“Ctrl+Alt+Shift+N” and this will open up one for you. You should now have four windows
open on your screen, I’ve labelled these 1-4 for easier following.
, Panel 1 is where you will input all of your code, this will make finding mistakes A LOT easier
to find as well as ensuring that your work stays neat and presentable.
Panel 2 is where the code output will show. You will also notice that any errors will flag up in
red in this area along with telling you what line the error is in.
Panel 3 is where all of your data, graphs, etc will stay. This can be emptied but you have to
ensure that you re-run any installed packages (explained later) if and when you do empty
this.
Panel 4 has multiple tabs above it. You’re only really interested in 3 at this moment in time,
these are files, plots, and help.
Your next step in setting up your page for your data is focused in your panel 4. It will already
be on the files tab, you will need to stay on this tab, and create 3 new folders, named
‘scripts’, ‘figures’, and ‘data’. It is important to note that R is very case sensitive, so it is
recommended that all of your work is written in only lower case.
Your data should be given to you in the form of an excel spreadsheet, open this up in excel
and make sure you save it to your computer under a sensible name (remember R doesn’t
like spaces, so use underscores (_) in place of spaces) and as a .csv file. To do this, go to
save as, go to the drop-down menu underneath where you renamed your file, and select the
option that says ‘CSV UTF-8 (Comma delimited) (*.csv)’.
To upload this data onto your R project, go to your files tab in panel 4, click on your ‘data’
folder, and you want to select the tab that says ‘upload’, this should be the 3rd tab in this
folder. You then need to select ‘choose file’ and then find and upload the .csv file you just
saved. Then click okay. We’ll come back to this in a second.