Basic components of living systems
2.1: Microscopy
Seeing is believing
1st type of microscopes developed were light microscopes in the 16 th and 17th century
By mid-19th century, scientists had access to microscopes with a high enough level of magnification to allow
to see individual cells
o Cell theory was developed, and it states that:
Both plant and animal tissue is composed of cells
Cells are basic unit of all life
Cells only develop from existing cells
Timeline Development of cell theory
1665 Cell first observed
Robert Hooke observed the structure of thinly sliced cork using an early
light microscope.
He described the compartments he saw as cells.
As this was dead plant tissue, he was observing only cell walls.
1674-1683 First living cells observed
Anton van Leeuwenhoek developed a technique for creating powerful glass
lenses and 1st to observe bacteria and Protoctista, now known as
microorganisms.
1832 Evidence for the origin of new plant cells
Barthelemy Dumontier was 1st to observe cell division in plants providing
evidence that new cells arise from within old cells.
1833 Nucleus first observed
Robert brown was the 1st to describe the nucleus of a plant cell.
1837-1838 The birth of a universal cell theory
Matthias Schleiden proposed all plant cells are made of cells.
Jan Purkyne was 1st to use a microtome to make ultra-thin slices of tissue
for microscopic examination.
Theodor Schwann proposed all living things are composed of cells and cell
products.
1844(1855) Evidence for the origin of new animal cells
Robert Remak was 1st too observe cell division in animal cells. (wasn’t
believed at time)
Rudolf Virchow published these findings as his own later.
1860 Spontaneous generation disproved
Louis Pasteur disproved theory of spontaneous generation of cells by
demonstrating that bacteria would only grow in a sterile nutrient broth
after it had been exposed to the air.
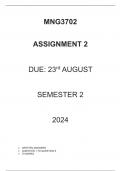
How a light microscope works
A compound light microscope has 2 lenses, the objective and eyepiece lens.
Objective lens produces a magnified image and eyepiece lens further magnifies it
Objective/eyepiece lens configuration allows for much higher magnification and reduced chromatic
aberration than that in a simple light microscope
Illumination is usually provided by a light underneath the sample
Opaque specimens can be illuminated from above with some microscopes
Sample preparation
Number of different ways in which samples and specimens can be prepared for examination by light
microscopy.
Method chosen will depend on the nature of the specimen and the resolution that is desired
Dry mount
o Solid specimens are viewed whole or cut into very thin slices with a sharp blade, this is called
sectioning.
, o The specimen is placed on the centre of the slide and the cover slip is placed over the sample
Wet mount
o Specimens are suspended in a liquid such as water or an immersion oil.
o A cover slip is placed on from an angle.
Squash slides
o A wet mount is 1st prepared, then a lens tissue is used to gently press down the cover slip
o Depending on the material, potential damage to a cover slip can be avoided by squashing the sample
between 2 microscope slides
o Using squash slides is a good technique for soft samples
o Care needs to be taken that the cover slip isn’t broken when being pressed
Smear slides
o The edge of a slide is used to smear the sample, creating a thin, even coating on another slide.
o A cover slip is then placed over the sample.
Staining
Crystal violet or methylene blue are positively charged dyes, which are attracted to negatively charged
materials in cytoplasm leading to staining of cell components.
Dyes such as nigrosine or Congo red are negatively charged and are repelled by negatively charged cytosol.
o These dyes stay outside cells, leaving the cells unstained, which then stand out against the stained
background
o This is a stain negative technique
Differential staining
o Can distinguish between 2 types of organisms that would otherwise be hard to identify
o It can also differentiate between different organelles of a single organism within a tissue sample
Gram stain technique
o Used to separate bacteria into 2 groups, gram-positive and gram-negative bacteria.
o Crystal violet is 1st applied to a bacterial specimen on a slide, then iodine, which fixes the dye.
o The slide is the washed with alcohol.
o The gram-positive bacteria retain the crystal violet stain and will appear blue or purple under a
microscope.
o Gram-negative bacteria have thinner cell walls and therefore lose the stain.
o They are then stained with safranin dye, which is called a counterstain.
o These bacteria will then appear red.
o Gram-positive bacteria are susceptible to the antibiotic penicillin, which inhibits the formation of cell
walls
o Gram-negative bacteria have much thinner cell walls that aren’t susceptible to penicillin
Acid-fast technique
o Used to differentiate species of mycobacterium from other bacteria
o A lipid solvent is used to carry carbolfuchsin dye into the cells being studied
o The cells are then washed with a dilute acid-alcohol solution.
o Mycobacterium aren’t affected by the acid-alcohol and retain the carbolfuchsin stain, which is bright
red.
o Other bacteria lose the stain and are exposed to a methylene blue stain, which is blue.
Stages involved in the production of pre-prepared slides:
o Fixing – chemicals like formaldehyde are used to preserve specimens in as near-natural a state as
possible
o Sectioning – specimens are dehydrated with alcohols and then placed in a mould with wax or resin
to form a hard block. This can then be sliced thinly with a knife called a microtome
o Staining – specimens are often treated with multiple stains to show different structures
o Mounting – the specimens are then secured to a microscope slide and a cover slip placed on top
Risk management
2.1: Microscopy
Seeing is believing
1st type of microscopes developed were light microscopes in the 16 th and 17th century
By mid-19th century, scientists had access to microscopes with a high enough level of magnification to allow
to see individual cells
o Cell theory was developed, and it states that:
Both plant and animal tissue is composed of cells
Cells are basic unit of all life
Cells only develop from existing cells
Timeline Development of cell theory
1665 Cell first observed
Robert Hooke observed the structure of thinly sliced cork using an early
light microscope.
He described the compartments he saw as cells.
As this was dead plant tissue, he was observing only cell walls.
1674-1683 First living cells observed
Anton van Leeuwenhoek developed a technique for creating powerful glass
lenses and 1st to observe bacteria and Protoctista, now known as
microorganisms.
1832 Evidence for the origin of new plant cells
Barthelemy Dumontier was 1st to observe cell division in plants providing
evidence that new cells arise from within old cells.
1833 Nucleus first observed
Robert brown was the 1st to describe the nucleus of a plant cell.
1837-1838 The birth of a universal cell theory
Matthias Schleiden proposed all plant cells are made of cells.
Jan Purkyne was 1st to use a microtome to make ultra-thin slices of tissue
for microscopic examination.
Theodor Schwann proposed all living things are composed of cells and cell
products.
1844(1855) Evidence for the origin of new animal cells
Robert Remak was 1st too observe cell division in animal cells. (wasn’t
believed at time)
Rudolf Virchow published these findings as his own later.
1860 Spontaneous generation disproved
Louis Pasteur disproved theory of spontaneous generation of cells by
demonstrating that bacteria would only grow in a sterile nutrient broth
after it had been exposed to the air.
How a light microscope works
A compound light microscope has 2 lenses, the objective and eyepiece lens.
Objective lens produces a magnified image and eyepiece lens further magnifies it
Objective/eyepiece lens configuration allows for much higher magnification and reduced chromatic
aberration than that in a simple light microscope
Illumination is usually provided by a light underneath the sample
Opaque specimens can be illuminated from above with some microscopes
Sample preparation
Number of different ways in which samples and specimens can be prepared for examination by light
microscopy.
Method chosen will depend on the nature of the specimen and the resolution that is desired
Dry mount
o Solid specimens are viewed whole or cut into very thin slices with a sharp blade, this is called
sectioning.
, o The specimen is placed on the centre of the slide and the cover slip is placed over the sample
Wet mount
o Specimens are suspended in a liquid such as water or an immersion oil.
o A cover slip is placed on from an angle.
Squash slides
o A wet mount is 1st prepared, then a lens tissue is used to gently press down the cover slip
o Depending on the material, potential damage to a cover slip can be avoided by squashing the sample
between 2 microscope slides
o Using squash slides is a good technique for soft samples
o Care needs to be taken that the cover slip isn’t broken when being pressed
Smear slides
o The edge of a slide is used to smear the sample, creating a thin, even coating on another slide.
o A cover slip is then placed over the sample.
Staining
Crystal violet or methylene blue are positively charged dyes, which are attracted to negatively charged
materials in cytoplasm leading to staining of cell components.
Dyes such as nigrosine or Congo red are negatively charged and are repelled by negatively charged cytosol.
o These dyes stay outside cells, leaving the cells unstained, which then stand out against the stained
background
o This is a stain negative technique
Differential staining
o Can distinguish between 2 types of organisms that would otherwise be hard to identify
o It can also differentiate between different organelles of a single organism within a tissue sample
Gram stain technique
o Used to separate bacteria into 2 groups, gram-positive and gram-negative bacteria.
o Crystal violet is 1st applied to a bacterial specimen on a slide, then iodine, which fixes the dye.
o The slide is the washed with alcohol.
o The gram-positive bacteria retain the crystal violet stain and will appear blue or purple under a
microscope.
o Gram-negative bacteria have thinner cell walls and therefore lose the stain.
o They are then stained with safranin dye, which is called a counterstain.
o These bacteria will then appear red.
o Gram-positive bacteria are susceptible to the antibiotic penicillin, which inhibits the formation of cell
walls
o Gram-negative bacteria have much thinner cell walls that aren’t susceptible to penicillin
Acid-fast technique
o Used to differentiate species of mycobacterium from other bacteria
o A lipid solvent is used to carry carbolfuchsin dye into the cells being studied
o The cells are then washed with a dilute acid-alcohol solution.
o Mycobacterium aren’t affected by the acid-alcohol and retain the carbolfuchsin stain, which is bright
red.
o Other bacteria lose the stain and are exposed to a methylene blue stain, which is blue.
Stages involved in the production of pre-prepared slides:
o Fixing – chemicals like formaldehyde are used to preserve specimens in as near-natural a state as
possible
o Sectioning – specimens are dehydrated with alcohols and then placed in a mould with wax or resin
to form a hard block. This can then be sliced thinly with a knife called a microtome
o Staining – specimens are often treated with multiple stains to show different structures
o Mounting – the specimens are then secured to a microscope slide and a cover slip placed on top
Risk management