Fatou Manneh
Determination of Ideal Gas Law Constant: Post Lab Questions and Notes
Make sure to read the lab handout and all Safety Instructions thoroughly before doing the
lab. Wear your gloves, safety goggles, and apron at all times while conducting the lab!
You are working with toxic chemicals for this lab. You should not eat, drink, chew gum, or do
this lab around children. Make sure to do this lab away from an area where you have food, and
thoroughly clean the area once you are finished.
This lab really will take you about 1.5 hours to do it carefully and correctly.
You MUST use the chart I have provided in this handout, NOT the chart that came with the lab
handout.
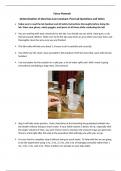
I set my beaker for the reaction in a cake pan, a lot of water spills and I didn’t want it going
everywhere and baking a huge mess. (See picture)
Step 6 will take some practice. I had a hard time at first inverting the graduated cylinder into
the beaker without losing to much water. If your initial volume is below 10 mL, especially with
the larger volumes of H2O2, you won’t have room to measure the amount of gas you generate.
There is a link right after this step in the procedure that will help you with your set up.
It is very hard to complete step 6 without losing to much water. To help with this we are going
to do the experiment using 1 mL, 2 mL, 2.5 mL, and 3 mL of hydrogen peroxide rather than 1
mL, 2 mL, 3 mL, and 4 mL. These numbers are already on your data table.
, You should hold the bottle while the reaction takes place, it is not very heavy so it could easily
fall over. (See picture)
In step 9 when you weigh the yeast out remember that it is a catalyst for the reaction. You want
to be close to 0.1 grams, it won’t affect your reaction yield if you are a little over, but do not use
less or your reaction may be to slow.
In step 12, measuring the hydrogen peroxide I used one of the plastic transfer pipets provided
in the kit to put the hydrogen peroxide into the 10-mL graduated cylinder. It made it much
easier to get the required volume.
You will see bubbles going into your gradated cylinder when your reaction is happening. The
procedure says each reaction takes about 1 minute, I found it was closer to 2 minutes so make
sure you wait for the bubbling to stop.
When your reaction is complete you can pull up the graduate cylinder to get your final volume
reading. However, make sure that you don’t pull the cylinder completely out of the water.
The procedure tells you to use 1 atm for the pressure. Here in the Denver metro area we are a
mile high, this means the atmospheric pressure is lower. We will be using 0.842 atm for our
atmospheric pressure.
HAVE FUN!!!!!
Determination of Ideal Gas Law Constant: Post Lab Questions and Notes
Make sure to read the lab handout and all Safety Instructions thoroughly before doing the
lab. Wear your gloves, safety goggles, and apron at all times while conducting the lab!
You are working with toxic chemicals for this lab. You should not eat, drink, chew gum, or do
this lab around children. Make sure to do this lab away from an area where you have food, and
thoroughly clean the area once you are finished.
This lab really will take you about 1.5 hours to do it carefully and correctly.
You MUST use the chart I have provided in this handout, NOT the chart that came with the lab
handout.
I set my beaker for the reaction in a cake pan, a lot of water spills and I didn’t want it going
everywhere and baking a huge mess. (See picture)
Step 6 will take some practice. I had a hard time at first inverting the graduated cylinder into
the beaker without losing to much water. If your initial volume is below 10 mL, especially with
the larger volumes of H2O2, you won’t have room to measure the amount of gas you generate.
There is a link right after this step in the procedure that will help you with your set up.
It is very hard to complete step 6 without losing to much water. To help with this we are going
to do the experiment using 1 mL, 2 mL, 2.5 mL, and 3 mL of hydrogen peroxide rather than 1
mL, 2 mL, 3 mL, and 4 mL. These numbers are already on your data table.
, You should hold the bottle while the reaction takes place, it is not very heavy so it could easily
fall over. (See picture)
In step 9 when you weigh the yeast out remember that it is a catalyst for the reaction. You want
to be close to 0.1 grams, it won’t affect your reaction yield if you are a little over, but do not use
less or your reaction may be to slow.
In step 12, measuring the hydrogen peroxide I used one of the plastic transfer pipets provided
in the kit to put the hydrogen peroxide into the 10-mL graduated cylinder. It made it much
easier to get the required volume.
You will see bubbles going into your gradated cylinder when your reaction is happening. The
procedure says each reaction takes about 1 minute, I found it was closer to 2 minutes so make
sure you wait for the bubbling to stop.
When your reaction is complete you can pull up the graduate cylinder to get your final volume
reading. However, make sure that you don’t pull the cylinder completely out of the water.
The procedure tells you to use 1 atm for the pressure. Here in the Denver metro area we are a
mile high, this means the atmospheric pressure is lower. We will be using 0.842 atm for our
atmospheric pressure.
HAVE FUN!!!!!