6/10/24, 5:58 AM GUI - Lecture Notes
5. GUI Programming in Python
5.1 What is GUI?
GUI is a Graphical Interface that is a visual representation of
communication presented to the user for easy interaction with the machine.
GUI means Graphical User Interface. It is the common user Interface that
includes Graphical representation like buttons and icons, and
communication can be performed by interacting with these icons rather
than the usual text-based or command-based communication.
How does GUI work?
The use of a pointer that serves as navigation to interact with different
visually appealing Graphical icons. Abstraction is a major concept that has
been used in a GUI operating system. Users can use the pointer to click on
the icon, which initiates a series of actions. Normally an application or
functionality will get started. Then the user will have to provide input or
tasks to generate the desired action from the machine. The GUI actually
translates user language, which comprises simple one-line commands,
single click and double clicks to machine language or assembly language.
The machine understands machine language, and hence the machine
responds to the task initiated, which is translated to use language and
communicated to the user via GUI.
Examples
1. Youtube
2. Google Chrome
How Does the User Interact with GUI?
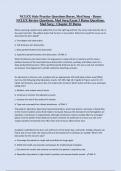
1. A user interacts with the GUI through simple functions like click,
which triggers the GUI to understand what the user wants and
promptly translates it to assembly language, as shown in the image
below.
2. Apart from the translation to machine language, GUI helps in
displaying the actual process that is being done, the response from
about:blank 1/63
,6/10/24, 5:59 AM GUI - Lecture Notes
the machine, the amount of memory that is being used, the size of the
file, the speed of the processor, the power being used by the computer,
what are the tasks being performed and many more features.
3. The user uses a single click to select a particular process.
4. Users can double-click to start an application.
Advantages of GUI
Simplicity.
It is visually appealing and makes anyone get involved in working with
the machine.
Even a guy with no computer knowledge can use the computer and
perform basic functions. GUI is responsible for that.
Searching becomes very easy as GUI provides a visual representation
of the files present and provides details about it.
Each and every response from the computer is visually communicated
through GUI.
A user with no computer knowledge can literally start learning about
the machine because of GUI as it provides scope for users to explore
and provides discoverability.
If, for example, a user starts using a computer with no Interface, then
he/she has to provide commands to the machine to execute each
task. In a way, the user must have some kind of programming
knowledge.
Disadvantages of GUI
One can only do what is already pre-programmed by some other
developer.
You cannot change the basic functionality of a system.
It takes more power for the system to function.
It is slow compared to simple command-based Interfaces.
It consumes more memory space.
GUI may be simple for a consumer but not as simple for the
programmers who have to design and implement each and every
function and apply abstraction to feel the advantages.
If the functionality that the user needs is not present, then the user
must know the commands that are necessary to proceed with the
flow, or else they are just stuck with it at the exact point.
5.2 Introduction to GUI Library
Tkinter is Python's default GUI library. It is based on the Tk toolkit,
originally designed for the Tool Command Language (Tcl). Due to Tk's
popularity, it has been ported to a variety of other scripting languages,
including Perl (Perl/Tk), Ruby (Ruby/Tk), and Python (Tkinter).
Getting Tkinter Installed and Working
Like threading, Tkinter is not necessarily turned on by default on your
system. You can tell whether Tkinter is available for your Python interpreter
about:blank 2/63
,6/10/24, 5:59 AM GUI - Lecture Notes
by attempting to import the Tkinter module. If Tkinter is available, then no
errors occur:
>>> import Tkinter
If your Python interpreter was not compiled with Tkinter enabled, the
module import fails:
>>> import Tkinter
Traceback (innermost last):
File "<stdin>", line 1, in ?
File "/usr/lib/python1.5/lib-tk/Tkinter.py", line 8, in ?
import _tkinter # If this fails your Python may not
be configured for Tk
ImportError: No module named _tkinter
You may have to recompile your Python interpreter to get access to Tkinter.
This usually involves editing the Modules/Setup file and enabling all the
correct settings to compile your Python interpreter with hooks to Tkinter or
choosing to have Tk installed on your system.
Tkinter and Python Programming
There are basically five main steps that are required to get your GUI up and
running:
1. Import the Tkinter module (or from Tkinter import *).
2. Create a top-level windowing object that contains your entire GUI
application.
3. Build all your GUI components (and functionality) on top (or "inside") of
your top-level windowing
object.
4. Connect these GUI components to the underlying application code.
5. Enter the main event loop.
Introduction to GUI Programming
A GUI Programming starts with a clean slate, a "top-level" windowing object
on which you build the rest of your components. In Tkinter, this foundation
is known as the top-level window object.
In GUI programming, a top-level root windowing object contains all of the
little windowing objects that will be part of complete GUI application. These
can be text labels, buttons, list boxes, etc. These individual little GUI
components are known as widgets.
In Python, this would typically look like this line:
top = Tkinter.Tk() # or just Tk() with "from Tkinter import *"
about:blank 3/63
, 6/10/24, 5:59 AM GUI - Lecture Notes
The object returned by Tkinter.Tk() is usually referred to as the root window,
hence the reason why some applications use root rather than top to indicate
as such. Top-level windows are those that show up standalone as part of the
application.
Widgets may be standalone or be containers. If a widget "contains" other
widgets, it is considered the parent of those widgets. Accordingly, if a widget
is "contained" in another widget, it's considered a child of the parent, the
parent being the next immediate enclosing container widget.
Tk has a couple of geometry managers that help position the widget in the
right place; the main one that you will use is called Pack, aka the packer.
Another geometry manager is Grid this is where you specify GUI widgets to
be placed in grid coordinates, and Grid will render each object in the GUI in
their grid position.
Once the packer has determined the sizes and alignments of all your
widgets, it will then place them on the screen for you. When all of the
widgets, including the top-level window, finally appear on your screen, your
GUI application then enters a "server-like" infinite loop. This infinite loop
involves waiting for a GUI event, processing it, then going back to wait for
the next event.
The final step we described above says to enter the main loop once all the
widgets are ready. This is the "server" infinite loop we have been referring to.
In Tkinter, the code that does this is:
Tkinter.mainloop()
This is normally the last piece of sequential code your program runs. When
the main loop is entered, the GUI takes over execution from there. All other
action is via callbacks, even exiting your application.
When you pull down the File menu to click on the Exit menu option or close
the window directly, a callback must be invoked to end your GUI
application.
Top-Level Window: Tkinter.Tk()
We mentioned above that all main widgets are built into the top-level
window object. This object is created by the Tk class in Tkinter and is
created via the normal instantiation:
>>> import Tkinter
>>> top = Tkinter.Tk()
Within this window, you place individual widgets or multiple-component
pieces together to form your GUI.
about:blank 4/63
5. GUI Programming in Python
5.1 What is GUI?
GUI is a Graphical Interface that is a visual representation of
communication presented to the user for easy interaction with the machine.
GUI means Graphical User Interface. It is the common user Interface that
includes Graphical representation like buttons and icons, and
communication can be performed by interacting with these icons rather
than the usual text-based or command-based communication.
How does GUI work?
The use of a pointer that serves as navigation to interact with different
visually appealing Graphical icons. Abstraction is a major concept that has
been used in a GUI operating system. Users can use the pointer to click on
the icon, which initiates a series of actions. Normally an application or
functionality will get started. Then the user will have to provide input or
tasks to generate the desired action from the machine. The GUI actually
translates user language, which comprises simple one-line commands,
single click and double clicks to machine language or assembly language.
The machine understands machine language, and hence the machine
responds to the task initiated, which is translated to use language and
communicated to the user via GUI.
Examples
1. Youtube
2. Google Chrome
How Does the User Interact with GUI?
1. A user interacts with the GUI through simple functions like click,
which triggers the GUI to understand what the user wants and
promptly translates it to assembly language, as shown in the image
below.
2. Apart from the translation to machine language, GUI helps in
displaying the actual process that is being done, the response from
about:blank 1/63
,6/10/24, 5:59 AM GUI - Lecture Notes
the machine, the amount of memory that is being used, the size of the
file, the speed of the processor, the power being used by the computer,
what are the tasks being performed and many more features.
3. The user uses a single click to select a particular process.
4. Users can double-click to start an application.
Advantages of GUI
Simplicity.
It is visually appealing and makes anyone get involved in working with
the machine.
Even a guy with no computer knowledge can use the computer and
perform basic functions. GUI is responsible for that.
Searching becomes very easy as GUI provides a visual representation
of the files present and provides details about it.
Each and every response from the computer is visually communicated
through GUI.
A user with no computer knowledge can literally start learning about
the machine because of GUI as it provides scope for users to explore
and provides discoverability.
If, for example, a user starts using a computer with no Interface, then
he/she has to provide commands to the machine to execute each
task. In a way, the user must have some kind of programming
knowledge.
Disadvantages of GUI
One can only do what is already pre-programmed by some other
developer.
You cannot change the basic functionality of a system.
It takes more power for the system to function.
It is slow compared to simple command-based Interfaces.
It consumes more memory space.
GUI may be simple for a consumer but not as simple for the
programmers who have to design and implement each and every
function and apply abstraction to feel the advantages.
If the functionality that the user needs is not present, then the user
must know the commands that are necessary to proceed with the
flow, or else they are just stuck with it at the exact point.
5.2 Introduction to GUI Library
Tkinter is Python's default GUI library. It is based on the Tk toolkit,
originally designed for the Tool Command Language (Tcl). Due to Tk's
popularity, it has been ported to a variety of other scripting languages,
including Perl (Perl/Tk), Ruby (Ruby/Tk), and Python (Tkinter).
Getting Tkinter Installed and Working
Like threading, Tkinter is not necessarily turned on by default on your
system. You can tell whether Tkinter is available for your Python interpreter
about:blank 2/63
,6/10/24, 5:59 AM GUI - Lecture Notes
by attempting to import the Tkinter module. If Tkinter is available, then no
errors occur:
>>> import Tkinter
If your Python interpreter was not compiled with Tkinter enabled, the
module import fails:
>>> import Tkinter
Traceback (innermost last):
File "<stdin>", line 1, in ?
File "/usr/lib/python1.5/lib-tk/Tkinter.py", line 8, in ?
import _tkinter # If this fails your Python may not
be configured for Tk
ImportError: No module named _tkinter
You may have to recompile your Python interpreter to get access to Tkinter.
This usually involves editing the Modules/Setup file and enabling all the
correct settings to compile your Python interpreter with hooks to Tkinter or
choosing to have Tk installed on your system.
Tkinter and Python Programming
There are basically five main steps that are required to get your GUI up and
running:
1. Import the Tkinter module (or from Tkinter import *).
2. Create a top-level windowing object that contains your entire GUI
application.
3. Build all your GUI components (and functionality) on top (or "inside") of
your top-level windowing
object.
4. Connect these GUI components to the underlying application code.
5. Enter the main event loop.
Introduction to GUI Programming
A GUI Programming starts with a clean slate, a "top-level" windowing object
on which you build the rest of your components. In Tkinter, this foundation
is known as the top-level window object.
In GUI programming, a top-level root windowing object contains all of the
little windowing objects that will be part of complete GUI application. These
can be text labels, buttons, list boxes, etc. These individual little GUI
components are known as widgets.
In Python, this would typically look like this line:
top = Tkinter.Tk() # or just Tk() with "from Tkinter import *"
about:blank 3/63
, 6/10/24, 5:59 AM GUI - Lecture Notes
The object returned by Tkinter.Tk() is usually referred to as the root window,
hence the reason why some applications use root rather than top to indicate
as such. Top-level windows are those that show up standalone as part of the
application.
Widgets may be standalone or be containers. If a widget "contains" other
widgets, it is considered the parent of those widgets. Accordingly, if a widget
is "contained" in another widget, it's considered a child of the parent, the
parent being the next immediate enclosing container widget.
Tk has a couple of geometry managers that help position the widget in the
right place; the main one that you will use is called Pack, aka the packer.
Another geometry manager is Grid this is where you specify GUI widgets to
be placed in grid coordinates, and Grid will render each object in the GUI in
their grid position.
Once the packer has determined the sizes and alignments of all your
widgets, it will then place them on the screen for you. When all of the
widgets, including the top-level window, finally appear on your screen, your
GUI application then enters a "server-like" infinite loop. This infinite loop
involves waiting for a GUI event, processing it, then going back to wait for
the next event.
The final step we described above says to enter the main loop once all the
widgets are ready. This is the "server" infinite loop we have been referring to.
In Tkinter, the code that does this is:
Tkinter.mainloop()
This is normally the last piece of sequential code your program runs. When
the main loop is entered, the GUI takes over execution from there. All other
action is via callbacks, even exiting your application.
When you pull down the File menu to click on the Exit menu option or close
the window directly, a callback must be invoked to end your GUI
application.
Top-Level Window: Tkinter.Tk()
We mentioned above that all main widgets are built into the top-level
window object. This object is created by the Tk class in Tkinter and is
created via the normal instantiation:
>>> import Tkinter
>>> top = Tkinter.Tk()
Within this window, you place individual widgets or multiple-component
pieces together to form your GUI.
about:blank 4/63