LABORATORY MANUAL
ACTIVITY 12
AIM
To observe diffraction of light due to a thin slit.
APPARATUS AND MATERIAL REQUIRED
Two razor blades, one adhesive tape/cello-tape, source of light (electric
bulb/ laser pencil), a piece of black paper, two glass plats.
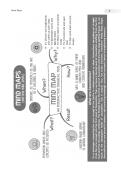
P RINCIPLE
When a beam of light passes through a
fine opening (aperture) or around a sharp
obstacle, it bends around corners of the
obstacle/aperture. The light beam
Glass plate
spreads and penetrates into the
geometrical shadow of the obstacle. This
Black paper phenomenon of bending of light around
fine openings/obstacles is called
diffraction and is one of the evidences in
favour of wave nature of light. It arises
because of the interference of light waves
Fig. A 12.1 A fine slit made by using two razor from different points of the same wave
blades, one glass plats and a piece of front. Two razor blades with their sharp
black paper. edges held parallel, quite close to each
other (separation being of the order of wavelength of light λ) form a
fine single slit (Fig. A 12.1). The diffraction pattern due to a single
slit consists of a central bright band, surrounded on both sides by
coloured bands (with electric bulb) and alternate dark and bright
bands (with laser pencil) of decreasing intensity and fringe width.
P ROCEDURE
1. Make a fine, single slit using razor blades. For this purpose, take a
glass plate and fix a black paper on top of it. Cut out a narrow slit in
the central part of the black paper. Place two razor blades, side by
side, quite close to each other over this slit as shown in Fig. A 12.1.
190
, ACTIVITY 12
2. Place a glowing clear electric lamp preferably with a straight
filament (or a laser pencil) at sufficient distance (about 4 to 8m)
behind the fine slit between the two sharp edges of the razor blades.
Observe the lamp through the slit. What do you find?
3. Alternatively, place the slit about 0.5m from the wall and the source
of light at a distance of about 15-20 cm behind the slit. Observe
the light falling on the wall.
4. Repeat the observations of steps 2 and 3 with a laser pencil. Note
the changes you observe.
R ESULT
Light waves incident on very fine apertures (openings) bend arround
corners and exhibit phenomenon of diffraction.
D ISCUSSION
1. The sharpness of diffraction fringes depends mainly on the
extreme fineness of the slit, made using razor blades, keeping
them quite close to each other.
2. Monochromatic light from a laser pencil is preferred over ordinary
electric bulb for obtaining better effect on the screen.
With ordinary light (an electric bulb) not many fringes are
observed clearly, while with a monochromatic source (laser
pencil) a large number of distinct bright and dark fringes are
observed for a reasonable width of the slit.
S
ELF ASSESSMENT
1. Hold two razor blades side by side so that nearer sharp edges
are parallel and quite close to each other. The two edges are
often not parallel to each other when held like this. Do you expect
the bands to become wider and/or closely spaced at a point/part
of the slit where the separation of the edges is less? Do you find
bands having some colours? Interpret your observations.
[Hint: The position of all the bands, except the central band,
depends on wavelength and they will show some colours. Use of
a filter for red or blue will make the bands/fringes clearer. You
can easily observe wider bands/fringes by using a red filter
compared to that by using a blue filter.
2. The diffraction pattern is observed for slit widths of the order of
wavelength λ of light used. Observe what happens when the slit
width is few times λ. Interpret the reason.
191
, LABORATORY MANUAL
ACTIVITY 13
AIM
To study the nature and size of the image formed by (i) a convex
lens (ii) a concave mirror on a screen by using a candle and a
screen (for different distances of the candle from the lens/mirror).
(i) To study nature and the size of the image formed by a convex
lens. (for different distances of the candle from the lens)
APPARATUS AND MATERIAL REQUIRED
A candle, match box, a small candle-stand, a convex lens of small
focal length and known thickness, a screen with a stand, metre scale.
P RINCIPLE
The position, nature and size of the image of an object formed by a
thin convex lens varies with the change in the position of the object
as illustrated in Fig. A 13 (i).1(a) to A 13 (i).1(f) for some specific
positions. It is assumed that both the spherical surfaces of the lens
have same radi of curvature.
(a) Object is at infinity, i.e., u = ∞. A real, inverted and highly diminished
image is formed at the second principal focus, F2 on the other side
of the lens, i.e. v = f, (i) when incident rays of light is parallel to the
principal axis; and (ii) when incident rays of light are not parallel to
192
ACTIVITY 12
AIM
To observe diffraction of light due to a thin slit.
APPARATUS AND MATERIAL REQUIRED
Two razor blades, one adhesive tape/cello-tape, source of light (electric
bulb/ laser pencil), a piece of black paper, two glass plats.
P RINCIPLE
When a beam of light passes through a
fine opening (aperture) or around a sharp
obstacle, it bends around corners of the
obstacle/aperture. The light beam
Glass plate
spreads and penetrates into the
geometrical shadow of the obstacle. This
Black paper phenomenon of bending of light around
fine openings/obstacles is called
diffraction and is one of the evidences in
favour of wave nature of light. It arises
because of the interference of light waves
Fig. A 12.1 A fine slit made by using two razor from different points of the same wave
blades, one glass plats and a piece of front. Two razor blades with their sharp
black paper. edges held parallel, quite close to each
other (separation being of the order of wavelength of light λ) form a
fine single slit (Fig. A 12.1). The diffraction pattern due to a single
slit consists of a central bright band, surrounded on both sides by
coloured bands (with electric bulb) and alternate dark and bright
bands (with laser pencil) of decreasing intensity and fringe width.
P ROCEDURE
1. Make a fine, single slit using razor blades. For this purpose, take a
glass plate and fix a black paper on top of it. Cut out a narrow slit in
the central part of the black paper. Place two razor blades, side by
side, quite close to each other over this slit as shown in Fig. A 12.1.
190
, ACTIVITY 12
2. Place a glowing clear electric lamp preferably with a straight
filament (or a laser pencil) at sufficient distance (about 4 to 8m)
behind the fine slit between the two sharp edges of the razor blades.
Observe the lamp through the slit. What do you find?
3. Alternatively, place the slit about 0.5m from the wall and the source
of light at a distance of about 15-20 cm behind the slit. Observe
the light falling on the wall.
4. Repeat the observations of steps 2 and 3 with a laser pencil. Note
the changes you observe.
R ESULT
Light waves incident on very fine apertures (openings) bend arround
corners and exhibit phenomenon of diffraction.
D ISCUSSION
1. The sharpness of diffraction fringes depends mainly on the
extreme fineness of the slit, made using razor blades, keeping
them quite close to each other.
2. Monochromatic light from a laser pencil is preferred over ordinary
electric bulb for obtaining better effect on the screen.
With ordinary light (an electric bulb) not many fringes are
observed clearly, while with a monochromatic source (laser
pencil) a large number of distinct bright and dark fringes are
observed for a reasonable width of the slit.
S
ELF ASSESSMENT
1. Hold two razor blades side by side so that nearer sharp edges
are parallel and quite close to each other. The two edges are
often not parallel to each other when held like this. Do you expect
the bands to become wider and/or closely spaced at a point/part
of the slit where the separation of the edges is less? Do you find
bands having some colours? Interpret your observations.
[Hint: The position of all the bands, except the central band,
depends on wavelength and they will show some colours. Use of
a filter for red or blue will make the bands/fringes clearer. You
can easily observe wider bands/fringes by using a red filter
compared to that by using a blue filter.
2. The diffraction pattern is observed for slit widths of the order of
wavelength λ of light used. Observe what happens when the slit
width is few times λ. Interpret the reason.
191
, LABORATORY MANUAL
ACTIVITY 13
AIM
To study the nature and size of the image formed by (i) a convex
lens (ii) a concave mirror on a screen by using a candle and a
screen (for different distances of the candle from the lens/mirror).
(i) To study nature and the size of the image formed by a convex
lens. (for different distances of the candle from the lens)
APPARATUS AND MATERIAL REQUIRED
A candle, match box, a small candle-stand, a convex lens of small
focal length and known thickness, a screen with a stand, metre scale.
P RINCIPLE
The position, nature and size of the image of an object formed by a
thin convex lens varies with the change in the position of the object
as illustrated in Fig. A 13 (i).1(a) to A 13 (i).1(f) for some specific
positions. It is assumed that both the spherical surfaces of the lens
have same radi of curvature.
(a) Object is at infinity, i.e., u = ∞. A real, inverted and highly diminished
image is formed at the second principal focus, F2 on the other side
of the lens, i.e. v = f, (i) when incident rays of light is parallel to the
principal axis; and (ii) when incident rays of light are not parallel to
192