MICROSOFT OFFICE TUTORIALS
THESIS AND DISSERTATION FORMATTING
1
SETTING MARGINS
3
SETTING THE HEADER AND FOOTER
7
CHANGING THE PAGE NUMBER FORMAT
11
REMOVING PAGE NUMBERS FROM THE FIRST PAGE
13
TURNING ON FORMATTING MARKS
14
FORMATTING TABLE BORDERS
18
CENTERING FIGURES/TABLES VERTICALLY ON PAGE
21
SWITCHING PAGE ORIENTATION TO LANDSCAPE
24
FORMATTING LANDSCAPE PAGE NUMBERS
29
REMOVING EXTRA SPACES
29
REMOVING EXTRA SPACES IN YOUR TEXT
31
REMOVING EXTRA SPACES IN YOUR FOOTER
34
FORMATTING YOUR REFERENCES
, SETTING MARGINS
1. SELECT THE “LAYOUT” TAB AT THE TOP OF THE SCREEN. It is to the right of the “Home” Tab
where you’ll land when you open Word.
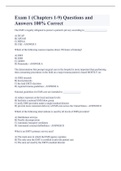
2. CHOOSE “MARGINS” UNDER THE “LAYOUT” TAB. The margins menu is on the very left of the
“Layout” toolbar. When you click it, a drop-down menu will appear.
1
,3. SELECT “CUSTOM MARGINS.” At the bottom of the “Margins” drop-down menu, you’ll see an
option for “Custom Margins.” Click where it says “Custom Margins” to bring up the margin
editor.
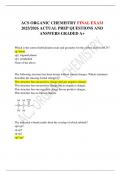
4. ENTER THE CORRECT MARGINS. The margins editor will appear on your screen. You can enter
the margins manually, or use the arrows next to each margin setting. Your margins should be
1” on the top and right, 1.25” on the bottom, and 1.5” on the left. Click “ok” when you’re
finished.*
*It’s best to set these margins before you begin writing. Otherwise, changing the margins may change the layout of
your content.
2
, SETTING THE HEADER AND FOOTER
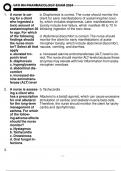
1. CLICK THE “INSERT” TAB. At the top of the screen, click on the tab that says “Insert” to
bring up the “Insert” toolbar.
2. ON THE “INSERT” TOOLBAR, CHOOSE THE HEADER DROP-DOWN MENU. Once you open the
“Insert” toolbar, click where it says “Header” to open the “Header” drop-down menu.
3
THESIS AND DISSERTATION FORMATTING
1
SETTING MARGINS
3
SETTING THE HEADER AND FOOTER
7
CHANGING THE PAGE NUMBER FORMAT
11
REMOVING PAGE NUMBERS FROM THE FIRST PAGE
13
TURNING ON FORMATTING MARKS
14
FORMATTING TABLE BORDERS
18
CENTERING FIGURES/TABLES VERTICALLY ON PAGE
21
SWITCHING PAGE ORIENTATION TO LANDSCAPE
24
FORMATTING LANDSCAPE PAGE NUMBERS
29
REMOVING EXTRA SPACES
29
REMOVING EXTRA SPACES IN YOUR TEXT
31
REMOVING EXTRA SPACES IN YOUR FOOTER
34
FORMATTING YOUR REFERENCES
, SETTING MARGINS
1. SELECT THE “LAYOUT” TAB AT THE TOP OF THE SCREEN. It is to the right of the “Home” Tab
where you’ll land when you open Word.
2. CHOOSE “MARGINS” UNDER THE “LAYOUT” TAB. The margins menu is on the very left of the
“Layout” toolbar. When you click it, a drop-down menu will appear.
1
,3. SELECT “CUSTOM MARGINS.” At the bottom of the “Margins” drop-down menu, you’ll see an
option for “Custom Margins.” Click where it says “Custom Margins” to bring up the margin
editor.
4. ENTER THE CORRECT MARGINS. The margins editor will appear on your screen. You can enter
the margins manually, or use the arrows next to each margin setting. Your margins should be
1” on the top and right, 1.25” on the bottom, and 1.5” on the left. Click “ok” when you’re
finished.*
*It’s best to set these margins before you begin writing. Otherwise, changing the margins may change the layout of
your content.
2
, SETTING THE HEADER AND FOOTER
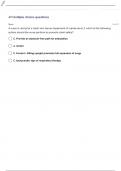
1. CLICK THE “INSERT” TAB. At the top of the screen, click on the tab that says “Insert” to
bring up the “Insert” toolbar.
2. ON THE “INSERT” TOOLBAR, CHOOSE THE HEADER DROP-DOWN MENU. Once you open the
“Insert” toolbar, click where it says “Header” to open the “Header” drop-down menu.
3