EEE 202 Lab 3: Registers, Counters, and the “Brainless CPU”
Prerequisites: Before beginning this lab, you must:
Understand how to use the tool flow (See the installation guide and Lab 0)
Describe the operation of an edge-triggered D flip flop.
Identify the building blocks of a synchronous counter.
Have completed Lab 1: Half Adder, Full Adder, 4-bit Incrementer and Adder.
Have completed Lab 2: Multiplexers, Decoders and the Arithmetic Logic Unit.
Equipment: Personal computer with the required software installed.
Files to copy from Lab 2 (do NOT copy from Lab 1!):
alu.dig
and_add.dig
four_bit_adder.dig
four_bit_mux.dig
full_adder.dig
half_adder.dig
incrementer.dig
not_neg.dig
two_bit_mux.dig
Files to download:
four_bit_reg_top.v
four_bit_reg_stim.v
ram_vals.hex
brainless_top.v
brainless_stim.v
Objectives: When you have completed this lab, you will be able to:
Build and test a 4-bit D register.
Build, test and implement a 4-bit up counter.
Build a 16-word, 4-bit RAM.
Build and simulate a microprocessor that is absent a controller.
Act as the controller for an elementary microprocessor.
Introduction
In Labs 1and 2, we built almost all of the combinational logic circuits we’ll need for our
microprocessor. In this lab, our aim is to build a few more circuits that we’ll need to build a
complete microprocessor. First, we will solve the problem of not being able to store any data by
building a 4-bit parallel D register that consists of four individual D flip-flops wired to a common
bus. We will then use this memory block to build a counter along with the incrementer we built
in Lab 1. Then we will look at another memory circuit, the RAM, that will be used in our
microprocessor to store the data for our CPU. In the last part of this lab (careful, this will take
,quite some time!!!), we will assemble our microprocessor and call it the “brainless
microprocessor”. You will act as the “brains” (or controller) for this processor and manually
manipulate the signals controlling the ALU, registers, decoders, and memory, to cause the
microprocessor to perform a series of operations we will eventually call an instruction, and a
series of instructions we will eventually call a program.
Warning: Use the signal and circuit names provided! Verilog does not allow names to start
with a number or names that have dashes!
Create a folder named Lab3. Into that folder, copy the files listed above from Lab 2. Be sure to
only copy the required files. While it is tempting to do Lab 3 in the same directory where you
did a prior lab, it is advisable to start in a fresh directory in case something goes wrong. That
way, you still have the pristine prior lab results to copy again. In addition, this means that the
Lab 3 folder will only have the files necessary for Lab 3.
Once you’ve copied the files from Lab 2, download the files provided for Lab 3 and place them
in the Lab3 folder. Now, you’re ready to start!
NOTE: You are required to design the circuits as presented in this document. Even though
Digital supplies many of the functions we will design, you are not to use them.
Task 3-1: Build and Test a 4-Bit D Register with Enable
Because our microprocessor should operate on 4-bit numbers, we will have to build a 4-bit
storage circuit. Equipped with what you know about D flip-flops, you can now construct a 4-bit
parallel D register. The 4-bit parallel register should have 4-bit input and output buses, similar
to those you used for the 4-bit full adder in Lab 1. The clock input, however, remains a 1-bit
input. It also makes sense to include an enable input that allows you to control if the flip-flops
should change value when they encounter a clock edge or remain at their current value.
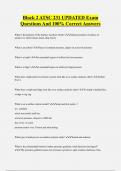
How does the enable work? Consider the circuit shown in Figure 1. (You will not be building this
circuit, it is being used to illustrate how the flip-flop with enable works.) Consider what will
happen if there is a rising edge on the clock but enable=0. In this case, the mux will select the
current value in the flip-flop and, therefore, the flip-flop’s contents will not change. On the
other hand, if enable=1, the mux will select the d input and the value on d will be loaded into
the flip-flop. Using an enable like this is very powerful as it allows us to control whether or not
we should load a new value into the flip-flop or maintain the current value. We’ll need this
capability so that our microprocessor can control which registers are to be loaded during any
particular clock cycle.
, Figure 1. Adding an enable to a flip-flop.
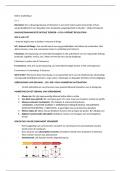
Now let’s build a 4-bit register with an enable as shown in Figure 2.
Figure 2. A 4-bit register with enable and reset.
The first step is to add the flip-flops. Select File->New and then File->Save As and name the new
circuit four_bit_reg. Digital will automatically append the .dig extension. Make sure it is saved
in the Lab3 folder.
Prerequisites: Before beginning this lab, you must:
Understand how to use the tool flow (See the installation guide and Lab 0)
Describe the operation of an edge-triggered D flip flop.
Identify the building blocks of a synchronous counter.
Have completed Lab 1: Half Adder, Full Adder, 4-bit Incrementer and Adder.
Have completed Lab 2: Multiplexers, Decoders and the Arithmetic Logic Unit.
Equipment: Personal computer with the required software installed.
Files to copy from Lab 2 (do NOT copy from Lab 1!):
alu.dig
and_add.dig
four_bit_adder.dig
four_bit_mux.dig
full_adder.dig
half_adder.dig
incrementer.dig
not_neg.dig
two_bit_mux.dig
Files to download:
four_bit_reg_top.v
four_bit_reg_stim.v
ram_vals.hex
brainless_top.v
brainless_stim.v
Objectives: When you have completed this lab, you will be able to:
Build and test a 4-bit D register.
Build, test and implement a 4-bit up counter.
Build a 16-word, 4-bit RAM.
Build and simulate a microprocessor that is absent a controller.
Act as the controller for an elementary microprocessor.
Introduction
In Labs 1and 2, we built almost all of the combinational logic circuits we’ll need for our
microprocessor. In this lab, our aim is to build a few more circuits that we’ll need to build a
complete microprocessor. First, we will solve the problem of not being able to store any data by
building a 4-bit parallel D register that consists of four individual D flip-flops wired to a common
bus. We will then use this memory block to build a counter along with the incrementer we built
in Lab 1. Then we will look at another memory circuit, the RAM, that will be used in our
microprocessor to store the data for our CPU. In the last part of this lab (careful, this will take
,quite some time!!!), we will assemble our microprocessor and call it the “brainless
microprocessor”. You will act as the “brains” (or controller) for this processor and manually
manipulate the signals controlling the ALU, registers, decoders, and memory, to cause the
microprocessor to perform a series of operations we will eventually call an instruction, and a
series of instructions we will eventually call a program.
Warning: Use the signal and circuit names provided! Verilog does not allow names to start
with a number or names that have dashes!
Create a folder named Lab3. Into that folder, copy the files listed above from Lab 2. Be sure to
only copy the required files. While it is tempting to do Lab 3 in the same directory where you
did a prior lab, it is advisable to start in a fresh directory in case something goes wrong. That
way, you still have the pristine prior lab results to copy again. In addition, this means that the
Lab 3 folder will only have the files necessary for Lab 3.
Once you’ve copied the files from Lab 2, download the files provided for Lab 3 and place them
in the Lab3 folder. Now, you’re ready to start!
NOTE: You are required to design the circuits as presented in this document. Even though
Digital supplies many of the functions we will design, you are not to use them.
Task 3-1: Build and Test a 4-Bit D Register with Enable
Because our microprocessor should operate on 4-bit numbers, we will have to build a 4-bit
storage circuit. Equipped with what you know about D flip-flops, you can now construct a 4-bit
parallel D register. The 4-bit parallel register should have 4-bit input and output buses, similar
to those you used for the 4-bit full adder in Lab 1. The clock input, however, remains a 1-bit
input. It also makes sense to include an enable input that allows you to control if the flip-flops
should change value when they encounter a clock edge or remain at their current value.
How does the enable work? Consider the circuit shown in Figure 1. (You will not be building this
circuit, it is being used to illustrate how the flip-flop with enable works.) Consider what will
happen if there is a rising edge on the clock but enable=0. In this case, the mux will select the
current value in the flip-flop and, therefore, the flip-flop’s contents will not change. On the
other hand, if enable=1, the mux will select the d input and the value on d will be loaded into
the flip-flop. Using an enable like this is very powerful as it allows us to control whether or not
we should load a new value into the flip-flop or maintain the current value. We’ll need this
capability so that our microprocessor can control which registers are to be loaded during any
particular clock cycle.
, Figure 1. Adding an enable to a flip-flop.
Now let’s build a 4-bit register with an enable as shown in Figure 2.
Figure 2. A 4-bit register with enable and reset.
The first step is to add the flip-flops. Select File->New and then File->Save As and name the new
circuit four_bit_reg. Digital will automatically append the .dig extension. Make sure it is saved
in the Lab3 folder.